
 English
 shqiptare
 عربي
عربي
 አማርኛ
አማርኛ
 আচাম
আচাম
 AzerbayjanlıName
 Eʋegbe
 Aymara
 Íris
Íris
 Eesti keel
 adeta
adeta
 BaskoaName
 БеларускаяName
 Bamanankan
 Български
 ÍslandName
 Polski
 Bosanski
 فارسی
فارسی
 इहो देखल जाय
 Booleaanse (Afrikaans)
 Татар
Татар
 Dansk
Dansk
 Deutsch
 Пермь
Пермь
 ትግንያውያን
 डोग्रिड ने दी
 Русский язык
 Français
 Sanskrit
 Pilipino
 suomi
suomi
 Frysk
Frysk
 ខ្មែរKCharselect unicode block name
 ჯორჯიანიName
 गोंगेन हें नांव
 ગુજરાતી
 pem
pem
 қазақ
қазақ
 Kreyòl ayisyen
 한국어
한국어
 dictionary variant
 Nederlands
 Кыргыз тили
 Galiciano
 Catalan
 Čeština
 ಕನ್ನಡ್Name
 Histocre
 a n:n
a n:n
 Hrvatska
 Quechua
 Zimanê Kurdî
 Zimanê Kurdî
 Latina
 Latvijas
 ກະຣຸນາ
 Lingala
 Luganda
 LëtzebuergeschName
 Ruwanda
 română
 Malagasy
 Malti
Malti
 【+86-158-1765-4546 Miss Zhu】 【+86-138-2884-5503 Mr.Chen】
  380052178@qq.com


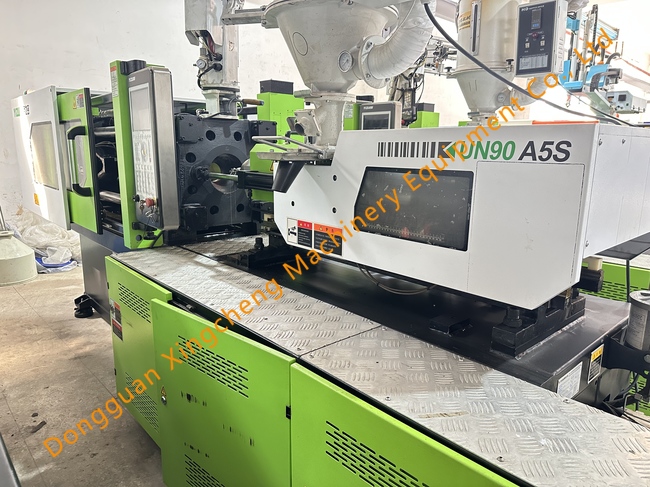
Installation Method
- Site Selection: Choose a well - ventilated, dry, and dust - free place. The ambient temperature should be between 0℃ and 40℃, the relative humidity should be below 75%, and the altitude should be below 1000 meters. It should be far away from equipment that causes electrical or magnetic interference. Also, leave enough space for equipment maintenance, mold disassembly, and the stacking of raw materials and finished products. The height of the workshop should meet the requirements for mold hoisting.

- Leveling Adjustment: If it is installed on a concrete foundation, the civil engineer should confirm the foundation condition before construction. If flexible anti - seismic feet are used, the ground bearing capacity should exceed 10t/m². Use a precision level to roughly adjust the longitudinal and transverse levels on the guide rails and tie - bars of the clamping part. For large - and medium - sized combined injection molding machines, also adjust the parallelism of the injection guide rails. Install the positioning pins connecting the clamping and injection devices, and tighten the connecting bolts and nuts.
- Mold Installation: Turn on the power of the injection molding machine and click the manual button to make the machine in the manual state. Start the oil - pressure system. Transport the mold to the site and confirm its compliance. Prepare the sling to lift the mold. Lift the mold slightly higher than the injection molding machine and then move it above the installation position. Slide the guide - post protective sleeve and slowly lower the mold. Install the positioning flange and protective ring to make them fit with the injection hole. Remove the locking module, close the sliding doors on both sides, and click the mold - adjustment button to enter the mold - adjustment state.
Operation Method
- Parameter Setting: This includes setting parameters such as opening and closing of the mold, ejector pin, and injection monitoring. For example, when setting the mold - closing parameters, it should be done step by step. The starting position of low - pressure mold protection is generally 2 - 5mm higher than the height of the product, and the ending position is 0.1 - 0.5mm larger than the mold parting surface. The low - pressure is adjusted by adding 1% to the mold - closing friction force, and the low - speed is adjusted within the range of 5% - 25% according to the mold - closing inertia. When setting the injection monitoring, first set the error value, deviation alarm, etc. in the SPC setting of the barrel, and then find the injection end point in the injection page for setting.
- Operation Process: Press the corresponding function keys on the main page to enter different operation interfaces, such as the F1 monitoring interface, F2 mold - opening and - closing interface, F3 mold - adjustment interface, etc. In manual operation, control the actions of mold open